This is just a quick run through to show how I did these spirally effects using meshes.
You want to make yourself a simple spiral mesh like the one above, you can do that either using a spline or a cylinder. But make sure that the pivot point is at the centre, so that it looks like everything's either being drawn into or pushed away from the centre of the effect.
You want to unwrap it to a straight line like this so that the texture can pan across it properly. The way I built the material in UDK means that if you want it to look like it's being drawn to the centre then you'd only need to rotate the UV's round 180. As they are now they'll look like they're being pushed away.
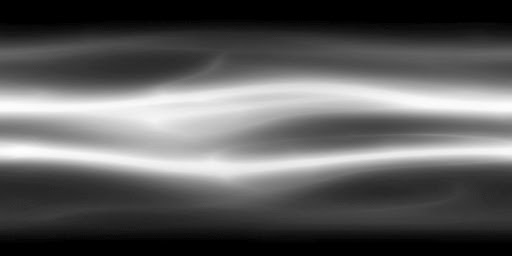 You'll need to create a couple of textures like this. The square gradient is just to soften the edges in the alpha. And you'll want to create a tileable that tiles horizontally. I imagine you'll want something maybe hand painted and quite ethereal looking.
Once you've imported everything into UDK you'll want to get started on the material. Start off by setting the Blend Mode to Additive and the Lighting Model to Unlit. Then click Two Sided.
Search for Linear Gradient in the Material Function Library (the bottom one) and then search for a Power and a Mesh Emitter Vertex Colour in the Material Expressions Library (the top one) and bring those in. Plug the U Gradient into the Base of the Power and the alpha of the Mesh Emitter Vert Colour into the Exponent. This will be so that you can control the fade along the mesh in Cascade. Now multiply all this against the square fall off texture you made. Then plug this into the Opacity.

Bring in your tileable texture and a Panner (by holding P and clicking) and a Texture Coordinate (by holding U and clicking). The Texture Coordinate is to control the stretch of your texture and the Panner to control the speed. Make sure your values are in the positive X direction. (I have two different textures that I add together but you don't need this) Then bring in a Vector Parameter (by holding V and clicking) to control the colour of the spiral. I then multiplied this by a Constant to improve it's intensity but you don't need to if you don't want to.
Then multiply the Vector Parameter against the panning texture. And multiply all of this against the Mesh Emitter Vertex Colour. And plug the result into the Emissive.
(Once you've finished the material, assign it to the mesh in the mesh editor, just to make it easier later on)
Now create a new particle system. In the blank space between the top orange box and the parameters; right click and go to TypeData, then down to New Mesh Data.
Go into Mesh Data and click on the spy glass I've highlighted. This will bring up the Content Browser and go and find your mesh and assign it.
If you've assigned the material to the mesh in the mesh editor then you're done. If you haven't, you'll need to assign the material. Go into Required and use the same method with the spy glass to look up the material and assign it.
You can start by deleting Initial Velocity because you don't need it. Then go into Initial Size and set the Max to 3 in X,Y and Z. And set the Min values to 0.5 X,Y and Z.
Now go into Spawn and click the little drop down tick and select FloatUniform. That'll change it to Min and Max values. For Max set it to 6 and Min set it to 3.
I forgot to screenshot it, but go into Lifetime and set the Min to 2 and the Max to 3.
Now go into Colour Over Life. Start by going down into Colour Over Life. There should be a Constant Curve with two points already set up. Change the In Value of the first point to 0.7 and the Out Values to 1,1,1. (I've gone with 3,3,3 because this will multiply the intensity of the colour in the material you've chosen, so just put it at whatever value you feel gives the best look) Now go down to the second point and change the In Value to 1 and the Out Value to 0,0,0.
Go down to Alpha Over Life and it is pretty much as before. Set the first point's In Value to 0 and the Out Value to 50. And set the second points' In Value at 1 and the Out Value at 0.
Now you'll want to graph it to get a smoother look. If you click the little graph symbol next to the Colour Over Life, you'll graph that to the Graph Editor. Click the little yellow square next to Alpha Over Life to hide that graph so that you're only dealing with Colour Over Life for now. Click the Fit to View All icon to see all the points. Select the first point by clicking on it and then click the AutoCurve button to smooth out the tangents.
Now unhide the Alpha Over Life curve and hide the Colour Over Life curve. Fit to view all again to see all the points. And select the first point and click the AutoCurve button. You should now see a tangent curve adjuster handle on the point you've still got selected. Use this to adjust the tangent to get it to curve down like the above picture.
This curve adjusts the speed at which the texture fades across the mesh. So using this handle adjust the curve to get the look you're going for.
Right click in the space below all the adjustment parameters and go down to Rotation and then Init Mesh Rotation. This is what will be used to break up the repetition to make it look like it's spreading out in all different directions.
Without changing anything, this will make the mesh choose a rotation on all axis'.
But if that's not what you're looking for and you only want it going out and up then for the Max values, make X and Y 0 and leave Z at 1.